In the next evolution of my GWMSIST independent studies developing a Bitcoin Mining Rig with a Raspberry Pi, I constructed a mining-rig capable of mining Ethereum i/a/o 240 Mh/s. I include in-depth documentation and a YouTube screencast divided into three-parts- beginning with: Parts List and Building the Rig; Configuring the Miner to Mine Ethereum with ethOS and nanopool; and the final part, Overclocking in Windows. I invite you to begin by purchasing the parts-list below and following along my instructions on how to begin building the miner under “Part 1 Screencast,” and continue buidling in Part 2 and Part 3- enjoy!
Part 1: Parts List and Building the Rig
- 1 * Crypto-Case- purchase either 6 or 8 GPU crypto-case depending on your budget:
- EVGA PSUs (Power-Supply): 2 EVGA SuperNOVA 1000 G3, 80 Plus Gold 1000W
- 1 * PSU SPLITTER
- 1 * ASRock H110 Pro BTC+ 13GPU Mining Motherboard CryptoCurrency
- 1 * Intel Pentium G Series 3.50 GHz Dual-Core LGA 1151 Processor
- Not necessary, but 1 heat-sink compound is recommended
- At least 1 (ideally 2) * CORSAIR Vengeance LPX 8GB (1 x 8GB) DDR4 DRAM 2400MHz C16
- GPUs- depending on your crypto-case size, purchase 6 or 8 of the following:
- XFX GTS Black Core Edition Radeon RX 580 DirectX 12 RX-580P828D6 8GB OC+ 1405 MHz PCI Express 3.0
- Recommended: Sapphire Radeon NITRO+ RX 580 8GB GDDR5.
- I achieved 30 Mh/s after overclocking these GPUs; these are favorite cards- highly recommend, if you have the budget.
- Please Note: purchase 2 * 1000 W PSU if purchasing the following: ASUS GeForce GTX 1080 8GB ROG STRIX Graphics Card (STRIX-GTX1080-A8G-GAMING)
- 1 * 6-pack, or 2 * 6-packs if building for 8 GPUs, PCIe Risers
- Purchase 1 of the following SSD hard-drives:
- If you just want to learn how to mine, purchase a low-cost, SSD-hard-drive
- If you wish to learn more about mining or plan to build more than two miners, purchase a Samsung SSD >= 250 GB.
- 1 * Cable Matters USB 3.0 SATA HDD/SSD Docking Station
- 1 * Electop 2 Pack 2 Pin SW PC Power Cable on/off Push Button
- 1 * Trezor Bitcoin wallet
- 1 * 50 ft CAT-6 Ethernet Cable (or however long of a throw it is to your modem or router)
- 1 * VGA to HDMI cable
- 4 * Rosewill Case Fan Splitter Cable
- 2 * Rosewill 120mm Case Fan 4-Pack, Long Life Sleeve Bearing Computer Case Fan ROCF-13001
- 1 * ethOS license.
Extra
- 1 * Killawatt
- 1 * Indoor air-quality monitor
- 1 * Tripp-Lite Surge-Protector Protection Rating >= 2,160 Joules
- PLEASE NOTE: if you need an extension cable for the power-squid, please be sure to purchase >= 10 gauge power-extension- cable- highly recommend the 25-100 ft cables sold by Amazon.
- 1 * 16 GB SSD USB thumb-drive for driver downloads and ethOS install.
- If you don’t own a keyboard and mouse, purchase a combo-pack from Amazon Basics ($15)
- If you don’t own a spare monitor, you can plug the rig into any flat-screen TV with an HDMI port.
Part 1 Screencast
Part 2: Configuring the Miner to Mine Ethereum with ethOS and nanopool
Part 1 Recap
This tutorial resumes from part-1 of this series beginning with a recap of Part 1 then introduces how to set-up a Trezor cryptocurrency wallet for cold-storage, followed-by a demonstration of how to send money from a Trezor wallet then back to a coinbase account, and concludes with configuring the miner environment for ethOS and nanopool.
How to Set-up a Trezor Wallet and Sending Ethers to Trezor (11:15 – 34:00)
- Purchase a Trezor wallet available via Amazon.
- Go to myetherwallet.com
- In the upper right corner, make sure you are using ETH or ETC
- Select “Send Ether & Tokens” or “View Wallet Info”
- Select “TREZOR”
- Select “Connect TREZOR”
- Unlock your TREZOR with PIN (and passphrase if you have it)
- A list of addresses will show up. Those are your ETH addresses that TREZOR manages. Use these as the destination address when you send your ethers from other wallets / exchanges.
- If you don’t know how to set-up a Trezor, go to mark 11:15 in the Part 2 series screencast.
Sending Ethers from TREZOR (34:20 – 48:00)
- Go to www.myetherwallet.com
- In the upper right corner, make sure you are using ETH or ETC
- Select “Send Ether & Tokens”
- Select “TREZOR”
- Select “Connect TREZOR”
- Unlock your TREZOR with PIN (and passphrase if you have it)
- Select the account/wallet/address you want to send ethers from (balance will show on the right)
- Enter value, address, and select Generate Transaction
- Confirm on TREZOR
- Confirm again on MEW (select “Send Transaction”)
Preparing the Miner Environment (49:20 – 1:07:45)
Download a copy of the latest BIOS from the ASRock H110 website. Decompress the downloaded file and upload the instant-flash executable on to a USB thumb-drive (PLEASE BE SURE TO FORMAT THE USB THUMB-DRIVE FOR MS-DOS/FAT32); after uploading the file to the USB thumb-drive, set aside until the next section of the tutorial, Installing ethOS (below).
Mac Users
- Go to GPU Shack and purchase the latest editiion of ethOS. Download the compressed-file iso-file to your desktop.
- If don’t have a file-compression/decompression tool, I suggest downloading a free-copy of the unarchiver tool from the Apple App store to decompress the ethoOS file purchased/downloaded from GPU-shack. Upon downloading, extract the file from the desktop as demonstrated in this YouTube tutorial.
- Hit the ‘CMD’ + ‘Spacebar’ on your Mac keyboard and type ‘Terminal’ to launch the command-line interface, then proceed with the following executables (Please note that the above sequence of commands assumes you’ve successfully decompressed the ethOS file downloaded from GPUshack and that the disk syntactically match your own- please watch the tutorial for clarification):
diskutil listsudo diskutil unmount /dev/disk2s1sudo dd if=/Users/mac-username/Desktop/ethos-1.3.1.img of=/dev/disk2
- The above process requires about 10 minutes to successfully burn the ethOS ISO image on to a SSD hard-drive.
Windows Users
- Download a copy of 7-Zip and the HDD Raw Copy Tool.
- After downloading ethOS from GPU shack extract the file on to your Windows Desktop.
- Identify the ISO image file (roughly 5 GB) and then access the HDD RAW Copy tool to burn the image on the hard-drive.
If for whatever reason my tutorial is confusing, I’ll redirect you to BitsBeTrippin’s YouTube for the ethOS install; he provides exemplary instructions on how to download and install ethOS on to a mining-rig.
Configuring the Motherboard BIOS
- Connect the SSD hard-drive to the SATA-power connector and connect the data-cable from the hard-drive to the motherboard.
- Insert the USB-drive containing the ASRock H110 Pro BTC BIOs update into the USB-port.
- Turn-on the mining rig.
- Continuously hit the F2-key to prompt the BIOs menu.
- Upon accessing the BIOs menu, select “Tool” from the top of the tool-bar.
- After accessing the “Tool” menu, double-click the “Instant Flash” option underneath the section “UEFI Update Utility”.
- Assuming the ASRock H110 Pro BTC BIOS update-file is automatically identified and accessed by the update-utility, select “Update” on the notification then select “Yes”; it will take approximately two-minutes to upload- upon completion, reboot the mining-rig.
- After rebooting, continuously hit the “F2” key to access the BIOs menu one more time- go to the “Boot” option available on the toolbar.
- Underneath “Boot-Option 1”, select “SATA-KINGSTON,” assuming you purchased the SSD-hard-drive as instructed, which should now contain the ethOS iso file we burned on the SSD-hard in part-2.
- Hit “Exit” in the top-right corner, then select “Save Changes and Exit”.
- Reboot the mining-rig and ethOS should automatically load- proceed below with “Installing ethOS.
- If for whatever reasons the above instructions are unclear, start at this time-stamp on my YouTube screencast.
Installing ethOS
After ethOS loads, type the following commands as instructed within the command-line interface.
- Stop the miner by entering
minestop - For the sake of InfoSec, reset the password by typing in
passwdand then enter the default password which is ‘live’, then choose a strong-password- confirm your new password by typing it again as requested. - Reconfigure the remote configuration file typing
vi remote.conf. Remove the first line within the file (Remember, this is Vim- so his the “Insert” key then remove that line by holding-down the ‘Delete’ key and then hit the ‘Escape’ + ‘:’ + ‘x’ key on save or write-over the file).- Update the system with
sudo ethos-update - Reboot the system with
sudo rebootbefore proceeding to step 7. - Update the miners with the following command
sudo update-miners. - Reboot the system with
sudo rebootbefore proceeding to step 8. - Access the local configure file by typing
vi local.conf. - If you’re building with the Radeon RX 580 cards, please update the file exactly as detailed within the markdown below, but PLEASE NOTE your ether-wallet-key, worker-name, and e-mail should be addressed according to your unique identifiers as explained in the video.
- Run the phoenixminer claymore hosted on the github docs and run the following one-liner
bash <(curl -s

https://raw.githubusercontent.com/cynixx3/third-party-miner-installer-for-ethos/master/miner-manager) phoenixminer install - After running the phoenix-miner install, return to the ethOS config file (ie
vi local.conf) and modify the following 10-lines. PLEASE NOTE: Since this blog-post was updated on 11/26/2020, it wasn’t covered in the corresponding YouTube vlogs featured on this tutorial- but anyways, Happy Thanksgiving! - Also, you need to buy a token from ethOS to run your miner; go to ethOS docs and scroll down to “Editing Token with Nano”.
- Note your token purhased from gpushack and then open your text editor with nano (eg
nano /home/ethos/token.auth). - After entering your token, type CTRL + X to over-write, or save the file.
- You can also inject your token straight from the ethOS command-line, simply by running the following command
echo -n "YOUR.TOKEN" > /home/ethos/token.auth - If for whatever reason you have any trouble with the above, the folks over at ethOS should be able to help- simply head over to the following link: http://ethosdistro.com/kb/#editing-token.
- Note your token purhased from gpushack and then open your text editor with nano (eg
- Lastly, to periodically update phoenixminer, simply run
ash <(curl -s

https://raw.githubusercontent.com/cynixx3/third-party-miner-installer-for-ethos/master/miner-manager) phoenixminer update
maxgputemp 85
globalminer phoenixminer
stratumproxy enabled
proxywallet ether-address.worker-name/EMAIL

proxypool1 eth-us-east1.nanopool.org:9999
proxypool2 eth-us-west1.nanopool.org:9999

globalcore 1200
globalmem 2175
globalfan 90
- To save the file, hit the ‘Escape’ + ‘:’ + ‘x’ key to save, or write-over the file.
Part 2 Screencast
Part 3: Overclocking in Windows
Downloading the Windows ISO File
Go to the Microsoft website and download the latest version of Windows (as of this screencast, it is Windows 10).
Burning the ISO File
macOS
Unetbootin
Download the unetbootin tool to burn the Windows ISO file.
Terminal
Alternatively, you can burn the ISO file with the below commands; however, I’ve experienced more issues burning the Windows ISO file from the command-line than I have with other operating-system ISO files like ethOS- but feel free to try the following:
diskutil listsudo diskutil unmount /dev/disk4s1sudo dd if=/Users/mac-username/Desktop/Win10_1803_English_x64.iso of=/dev/disk4
Windows
- Download the Rufus tool
- Burn the Windows ISO file utilizing the Rufus tool within windows.
If the aforementioned is unclear, feel free to check-out these links clarifying the Windows bootload installer.
- Installing Windows 10 on a Mac without Bootcamp
- Install Windows from a USB Flash Drive
- How to Format USB Drives on Windows 10
Ethereum Mining Guide
After installing Windows 10, Go the Ethereum Mining guide website and scroll-down to “Step 4” and follow along my YouTube screencast.
Claymore Mining Profiles on Windows 10
Claymore: Standard Configuration File
setx GPU_FORCE_64BIT_PTR 0
setx GPU_MAX_HEAP_SIZE 100
setx GPU_USE_SYNC_OBJECTS 1
setx GPU_MAX_ALLOC_PERCENT 100
setx GPU_SINGLE_ALLOC_PERCENT 100

EthDcrMiner64.exe -epool eth-eu1.nanopool.org:9999 -ewal your-ether-wallet-hex-key/your-worker-name/your-email-address -mode 1
Claymore: Overclocked Configuration File
setx GPU_FORCE_64BIT_PTR 0
setx GPU_MAX_HEAP_SIZE 100
setx GPU_USE_SYNC_OBJECTS 1
setx GPU_MAX_ALLOC_PERCENT 100
setx GPU_SINGLE_ALLOC_PERCENT 100

EthDcrMiner64.exe -epool eth-eu1.nanopool.org:9999 -ewal your-ether-wallet-hex-key/your-worker-name/your-email-address -mode 1 tstop 85 -tt 65 -fanmin 60 -fanmax 100 -cclock 1200 -mclock 2150 -cvddc 900 -mvddc 900 -dcri 15
Part 3 Screencast
Success: nanopool Reporting
As you can see from the nanopool reporting, a successful build constructed with AMD Radeon RX580 8GB GPUs should report hash-rates i/a/o at least 224.2 Mh/s, or 240 Mh/s if overclocked as detailed by the nanopool chart below- mission accomplished! Check-out my mining farm’s real-time updates via [nanopool](eg https://eth.nanopool.org/account/0xd4ef706dd812ffb2759162cf608553cd89af6cd9) and pay-outs via etherscan. Hope you enjoyed, folks- over and out.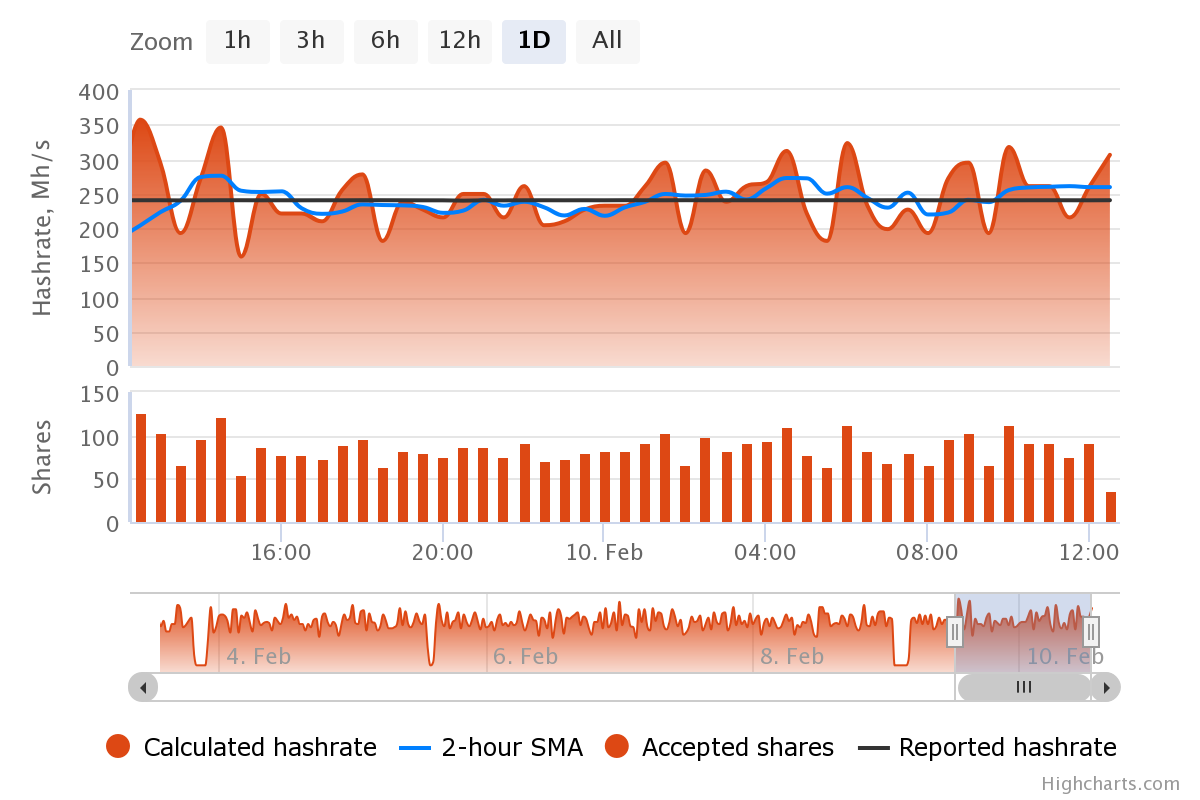
1 comment for “How to Build an Ethereum Mining Rig”