
Briefing: Why is this Blog-Post Entitled “GoldenEye”?
Well, without spoiling arguably the best James Bond film ever made, GoldenEye was a remarkably prescient movie at the time of production (1995) (let’s face it, folks- Pierce Brosnan was the best James Bond ever; not only that but the film also launched one of the first wildly successful gaming franchises). One of the first few scenes in the movie is shot near a remote military base entrenched beneath the frozen tundra just outside of Severnaya, Russia, which contains guidance-keys for a super-secret project code-named “GoldenEye,” a satellite equipped with a weaponized payload to deliver electro-magnetic pulse (EMP) for space to ground warfare. As the Cold War came to an end for a new Bond-era, the old military-guard maneuvered with oligarchs at the top as Russia transitioned into privatization- some of them joining the Janus Crime Syndicate, an international terrorist organization comprised of rogue intelligence agents, spooks and military. The renegade General Arkady Ourumov and his accomplice, Xenia Onatopp, a psychopathic femme fatale, successfully pull off a heist to hijack a Eurocopter TIGER with EMP countermeasures then fly to the Severnaya installation to ostensibly test the GoldenEye as a part of a routine military-drill just before brutally executing almost everyone on-site then detonating the GoldenEye satellite to cover their tracks and jam any communications preventing their escape. Fast-forwarding towards the end of the film, 007’s nemesis, 006, threatens to detonate the GoldenEye over London (international banking epicenter at the time) to create a world-wide financial meltdown just in time for his hedged trades; it should go without saying, Pierce Brosnan eviscerates 006 and all henchmen then goes home and fucks the prom-queen like he always does- THE END.

After 20 years post-production, GoldenEye was incredibly ahead of the curve, since asymmetric EMP attacks are now the sum of all fears within the Intelligence Community. The rest of the world notwithstanding, the American power-grid is incredibly fragile: in 2013, six highly-trained snipers knocked out 17 electricity-transformers within 19 minutes causing over $15 million dollars in damage before disappearing into the night without any trace-evidence at the Metcalf substation in Coyote, California, primarily responsible for powering Silicon Valley (not one finger-print was identified on over 100 7.62×39mm shell-casings, aka “Russian Shorts,” recovered on-site). The next year in 2014, the Federal Energy Regulatory Commission released a report warning, “…destroy nine interconnection substations and a transformer manufacturer and the entire United States grid would be down for at least 18 months, probably longer.” This is a stunning admission worth reflection almost five years later as we collectively watch the State of California idlely stand-by and cut the power for a week to over 179,000 customers in 17 counties because a little bit of wind could be like throwing gasoline on a bond-fire.
This is deeply troubling, folks: if our “Tinker-Toy” power-grid can’t hold a candle to the wind or a couple of expert marksman taking pot-shots at a substation bringing Silicon Valley to its knees within a few minutes, what happens if our financial-system was crippled by a coordinated CYBER-attack against USA infra? Enter Bitcoin- and it ain’t going anywhere, folks; it’s here to stay- let’s go ahead and list a few random reasons why:
- The Bitcoin Network has never been knocked offline ever since the first block was mined 3,961 days ago (over 11 years).
- Bitcoin uptime has been 99.999998% compared to the international banking industry average between 35-60%.
- As of November 1,2019, The price of Bitcoin has increased over 30,40,33,233% since the first transaction-block was mined.
- Over $11 Trillion dollars in transactions have consummated over the Bitcoin blockchain since inception.
- The overall cryptocurrency market cap stands at $250 billion, with Bitcoin’s share equating to 66.8% of the total.
The idea of civil-unrest in the United States of America is unthinkable to most- but let’s suppose we adapt the age-old American adage paying tribute to the Golden State: “As California goes, so goes the rest of the country;” if America is intentionally blacking-out in wine-country (no pun intended : ) as a contingency plan for electrical fires sparked by a little wind, the sobering reality is that our greatest fears about a coordinated computer network exploitation (CNE) or computer network attack (CNA) targeting a national power-grid for an extended period of time may prove to be a real possibility in the not too distant future. In the developing areas of the world, Bitcoin has already earned its spurs as a de facto currency of choice in the event of civil unrest- from Venezuela to Zimbabwe, Bitcoin has proven to be a reliable store of value and medium of exchange for transactions between two parties tendering goods and services. Nassim Taleb published “Antifragile: Things that Gain from Disorder and Chaos,” a treatise redefining strength within the prologue as “antifragility beyond resilience or robustness. The resilient resists shocks and stays the same; the antifragile gets better”- or thriving in the face of disorder and chaos. Every legacy financial system has a disaster recovery relief plan in place for “mission critical systems and resilience” with a calling-tree ready to pay lip-service with the rest of the workgroup over any given Saturday for testing once a year- but do you really think a coworker will be reachable by cellphone if the power is out? More than likely they’ll be caught between a nagging wife whining about the heat and dealing with their whining kids about why their Nintendo Switch is out of battery while on the phone with a griping in-law about the garage-door openers not working before they even think about getting started on their calling-trees that Sunday morning. With Bitcoin, there is no need for a calling-tree of disaster recovery plan- it’s already in play, working 24/7, 365 days a year. The Bitcoin blockchain is even broadcasting via satellite on Galaxy 18 with Blockstream, free of charge- no subscription to Iridium or HughesNet necessary; simply point a 36” satellite dish in the right direction at the sky, connect a laptop running LINUX and a power-user can maintain the entire Bitcoin blockchain, or distributed ledger, without relying on the Internet- even without the grid, powered only by a Ram Trucks 1500 EcoDiesel, which is as good of a Faraday Cage as any in the event of an EMP attack.
This tutorial will be segmented in three parts beginning with how to assemble the satellite, downloading and configuring the Ubuntu 18.04 environment for Blockstream service, and attaching a Wavlink Arieal HD2 for broadcast over a small-area or perhaps as a designated node on a mesh-network; there will be a screencast released within a few weeks of publishing this blog-post-detailing all steps of the aforementioned- a special thanks to grubles, one of the Blockstream engineering editors, for the original docs, which I’ve taken the liberty of updating for the sake of accuracy and posterity.

DISCLAIMER: In order to avoid any painstaking hell whatsoever, please purchase all of these parts exactly as detailed below before proceeding with this tutorial. Even if you’re an ace in web-development, this tutorial involves satellite alignment, which will require some patience negotiating along somewhat of a protracted learning-curve. This tutorial will more than likely crush your head like a grape, folks- Xenia Onatopp style. Ok, folks- get after your gear and strap it on:
- 1 * GEOSATpro 36″/90cm FTA Satellite Dish and .5dB NR SL1PLL Single Standard LNBF
- 1 * MAVERICK KU BAND PLL LNBF Free-To-Air Standard Linear FTA 11.7 – 12.2 GHz, KU LNBF (try eBay or Amazon- specifically look for frequency designation “11.7-12.2 GHz, KU”)
- 1 * Single Satellite TV Dish LNB Bracket
- 1 * 15ft White Outdoor & in Wall Quad Shield RG6 Cable 18AWG 3Ghz (If you plan to mount on a building instead of a mobile unit, purchase the 100 ft length)
- 1 * DirecTV 21 Volt Power Inserter For SWM Integrated LNB
- 1 * NooElec NESDR Smart v4 SDR – Premium RTL-SDR w/Aluminum Enclosure, 0.5PPM TCXO, SMA Input. RTL2832U & R820T2-Based Software Defined Radio
- 1 * SMA to F Adapter SMA Male to F Type Male RF Coaxial Coax Connector Cable Extension 19 inch
- 1 * A non-penetrating roof mount base that can support a 36” satellite dish (simply search for “non-penetrating roof mount base” on duckduckgo).
- 1 * Upgrade Version AC600 Outdoor Weatherproof WiFi Access Point POE, WAVLINK High Power Long Range Dual Band 2.4+5G 600Mbps Wireless Router/AP/Wi-Fi Range Extender Internet Signal Booster Amplifier
- 1 * Yellow Jacket 2886 UL Listed 14/3 15 Amp Premium SJTW 25′ (7.62M) Extension Cord with Grounded (3 prong) Lighted Receptacle End, 25 Foot, Yellow
- 1 * Tripp Lite 7 Outlet Surge Protector Power Strip, 7ft Cord (Rating: 2160 Joules)
- 1 * Seagate Backup Plus Slim 1TB External Hard Drive Portable HDD – Black USB 3.0 for PC Laptop and Mac
- 1 * Pinebook Pro (or any old laptop- PC or MAC)
Part 1: Satellite Assembly
In order to ensure Blockstream satellite acquisition, it is highly recommended to purchase the 36″ GEOSATpro satellite in lieu of the 18″ DirectTV satellite per Blockstream docs on GitHub; although Blockstream engineers, like Mr. Grubles, have captured Blockstream signal with the 18″ satellite, successful acquisition is contingent upon local geography and satellite-range- for the intents and purposes of this tutorial we will target Galaxy 18. Also- PLEASE NOTE– not just any LNB receiver will work (the device affixed to the end of the satellite); IT MUST BE AN LNB RECEIVER RATED FOR 11.7 – 12.2 GHz KU LNBF– so either the MAVERICK KU BAND PLL LNBF Free-To-Air Standard Linear FTA 11.7 – 12.2 GHz, KU LNBF as listed above, OR, if you purchase the 36″ GEOSATpro satellite as detailed within this tutorial, the appropriate LNB is already provided with purchase. Please be sure to consult local HOA bylaws if the satellite will not be mounted on a CRE property; according to a local satellite technician, 36″ is generally HOA compliant.

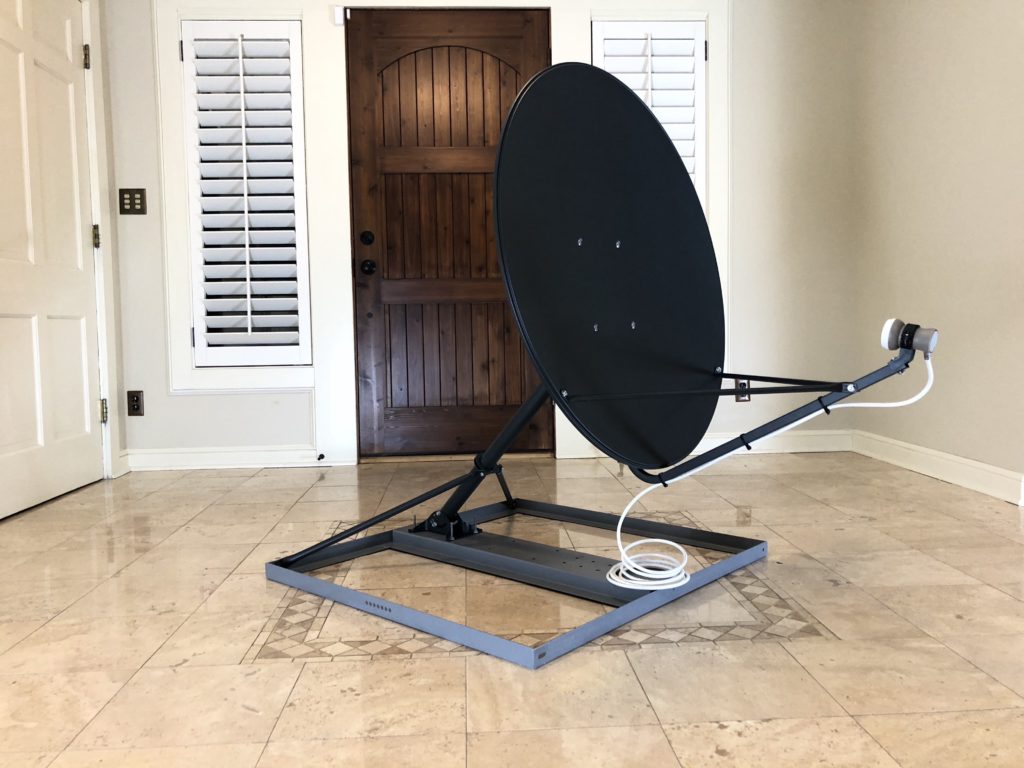
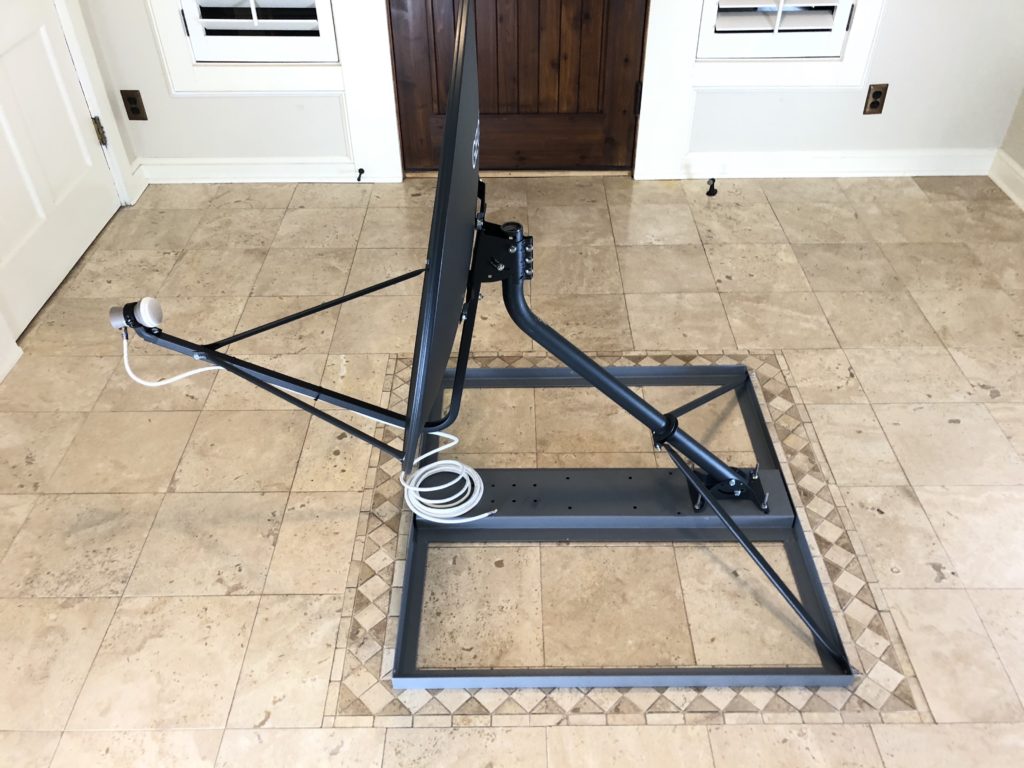
The assembly for the 36″ GEOSATpro is relatively straight-forward according to the instructions included and as depicted within the above and below diagrams (also available via the manufacturer website if need be).

Do not let the instructions intimidate: the satellite only requires about 45 mins to assemble- final assembly should appear as pictured. Please note- the non-penetrating satellite-mount is not included with purchase of a satellite and is generally sold separately at Amazon in case you wish to mount on another surface like a truck-rack (as discussed later in this tutorial).

The 38″ x 38″ satellite-mount should either be anchored to the roof with self-drilling screws or anchored with cinder-blocks placed at each corner of the satellite-mount.
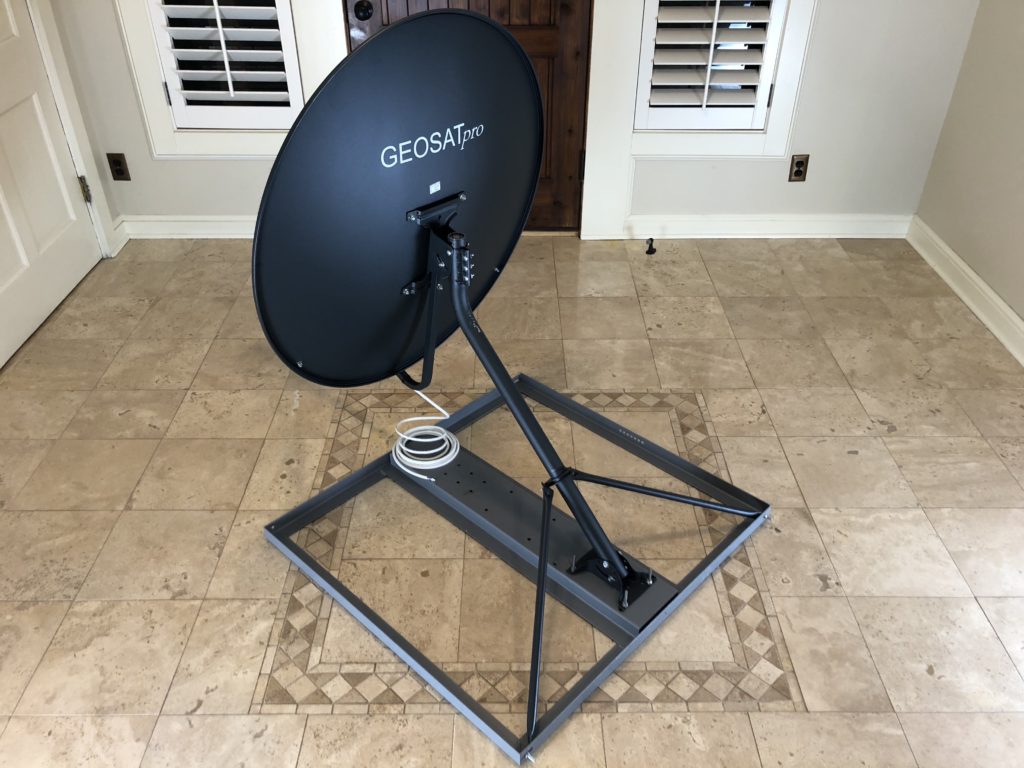
Upon completion of the satellite, the LNB featured with the subject GEOSATpro will not require an additional LNB-mount since a fixed-mount is provided.
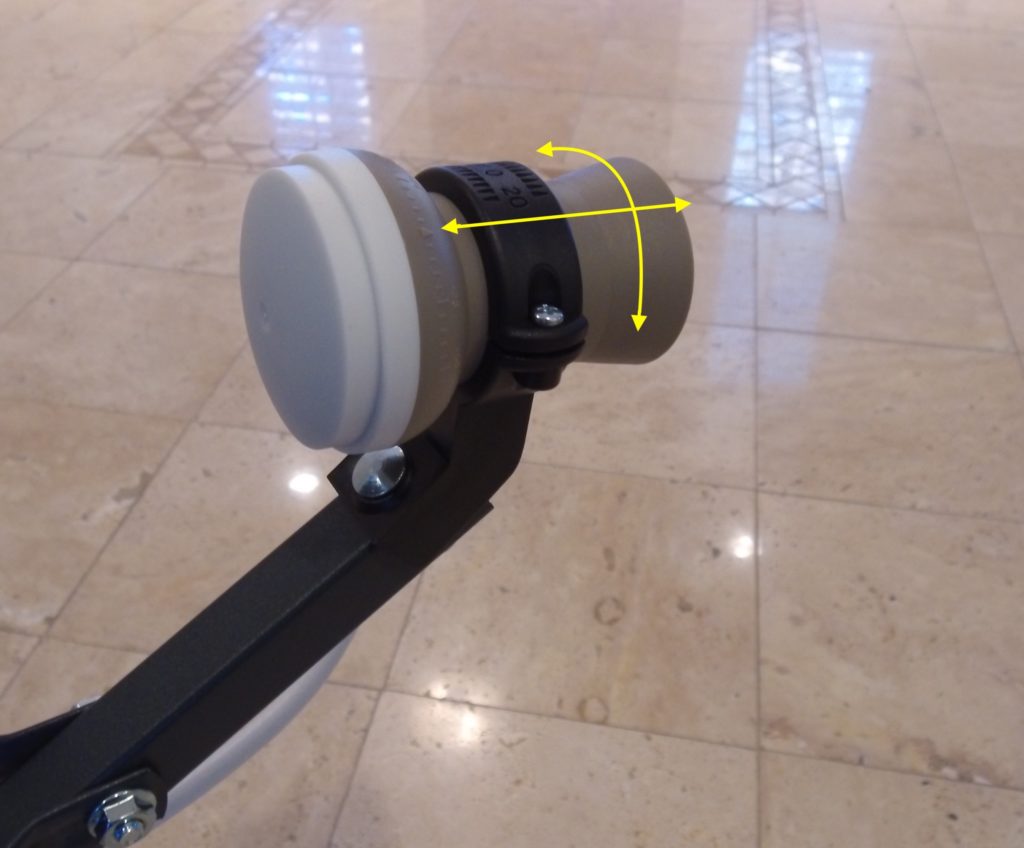
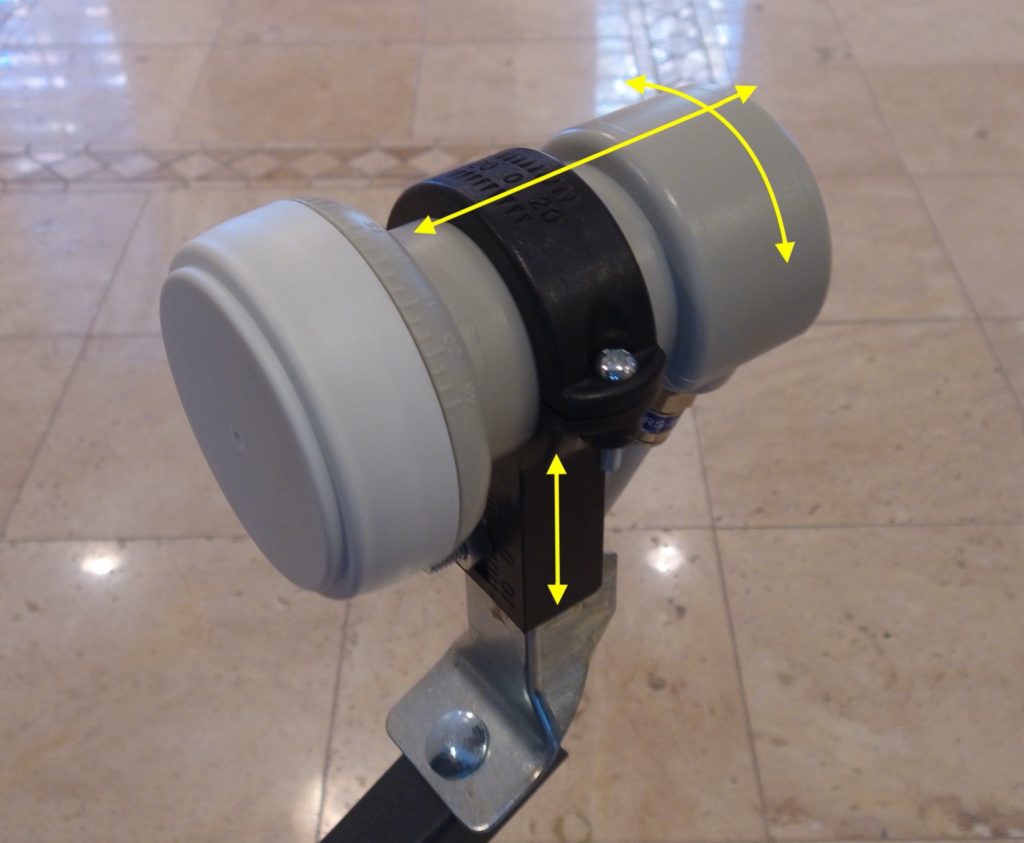
The second-part of this tutorial will demonstrate how to calibrate the LNB to control for polarity- so please understand how the LNB can be adjusted by depth and rotation (as detailed within the arrows above) in order to acquire the Blockstream satellite signal in addition to proper elevation alignment and azimuth. There are adjustable LNB mounts available for purchase controlling for length as well (as referenced within beginning parts-list) but it is not required for the GEOSATpro since it is already provided with purchase.
After affixing the LNB and mount on to the satellite, connect the coax-cable and zip-tie it to the satellite-arm with some slack for LNB adjustment if need be. The coax will connect to the “Power to SWiM” port on the 21 Volt Power Inserter For SWM Integrated LNB within the below picture.
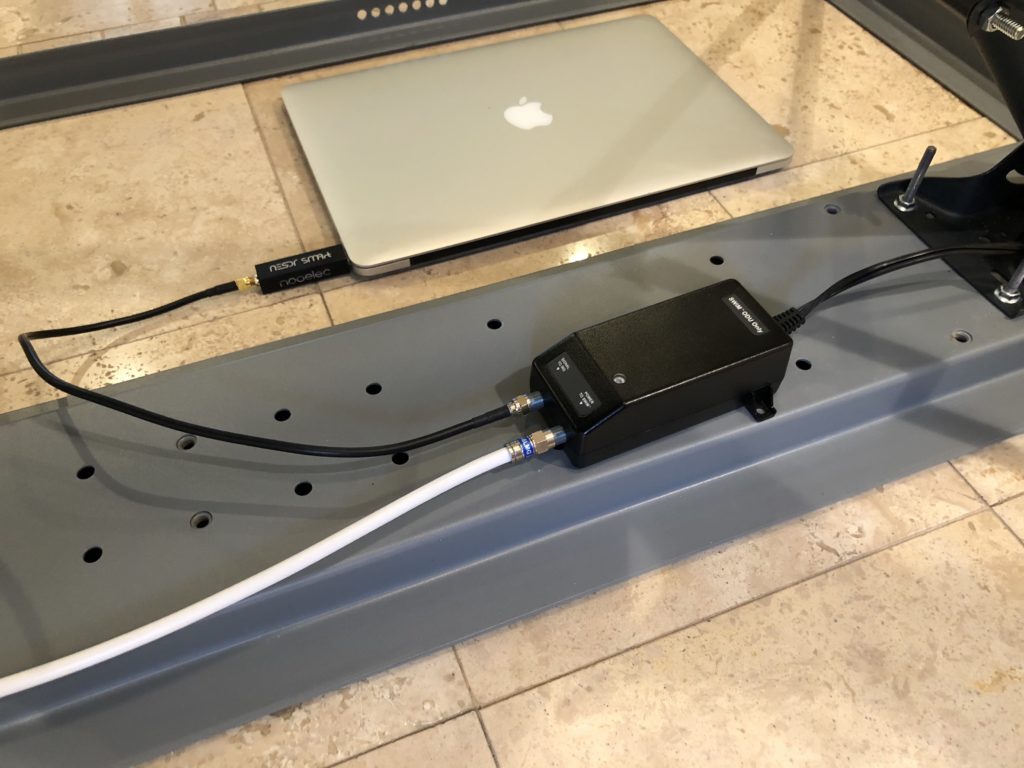
The SMA to F Adapter SMA Male to F Type Male RF Coaxial Coax Connector Cable Extension 19 inch cable connects the “Signal to IRD” port as pictured above, which connects to the NooElec NESDR Smart v4 SDR – Premium RTL-SDR w/Aluminum Enclosure, 0.5PPM TCXO, SMA Input. RTL2832U & R820T2-Based Software Defined Radio USB-adapter plugged into a laptop, which in this demo will be a retrofitted 2012 MacBook running Ubuntu 18.04. Please note the following sequence on how to correctly turn on the satellite LNB without causing any damage:
- Connect the NooElec NESDR Smart v4 SDR – Premium RTL-SDR w/Aluminum Enclosure, 0.5PPM TCXO, SMA Input. RTL2832U & R820T2-Based Software Defined Radio USB-adapter to the laptop.
- Connect the SMA to F Adapter SMA Male to F Type Male RF Coaxial Coax Connector Cable Extension 19 inch cable connecting the USB adapter from the laptop to the 21 Volt Power Inserter For SWM Integrated LNB.
- Connect the SMA to F Adapter SMA Male to F Type Male RF Coaxial Coax Connector Cable Extension 19 inch cable from the LNB to the 1 Volt Power Inserter For SWM Integrated LNB.
- The final and most important step to avoid any damage: plug-in the 21 Volt Power Inserter For SWM Integrated LNB to a power outlet.
- To turn-off or breakdown the satellite, please be sure to unplug the 21 Volt Power Inserter For SWM Integrated LNB from the outlet first, before disconnecting the previously mentioned components in reverse order.
One final step to note but not necessary yet is that the satellite-level should be as close to center as possible but subject to change if roof-placement is graded or terrain is not level; the satellite level must be pinpoint in order to successfully capture satellite-signal.
Part 2 of this tutorial will review how to retrofit an old PC or MacBook to run Ubuntu 18.04, configuring the environment for Blockstream service and installing Bitcoin Core.
Part 2: Configure Ubuntu 18.04 Environment for Blockstream Service and Running Bitcoin Core with FIBRE
Download Ubuntu 18.04 and Burn ISO
- Go to Ubuntu Desktop download page and download Ubuntu 18.04.
- After downloading the ISO file, burn the image on to a USB thumb-drive with the balenaEtcher tool (Mac users) or the Rufus tool (Windows). Please be sure to format the thumb-drive for FAT32 before burning the Ubuntu .iso file.
- As of this blog-post, macOS Catalina remains somewhat buggy with certain applications ranging from vmware Spaces and balenaEtcher tool; in case you encounter any issues with the latter, specifically with the corrupt .iso error flag after downloading the image file from the Ubuntu repository, fire up the terminal and run the following remediate then try again:
sudo /Applications/balenaEtcher.app/Contents/MacOS/balenaEtcher
- As of this blog-post, macOS Catalina remains somewhat buggy with certain applications ranging from vmware Spaces and balenaEtcher tool; in case you encounter any issues with the latter, specifically with the corrupt .iso error flag after downloading the image file from the Ubuntu repository, fire up the terminal and run the following remediate then try again:
- Insert USB thumb-drive into the laptop and power on the MacBook while holding-down the
Option/alt(⌥) key (is using a Dell, hold down the F12 key; if using another device, cross-reference search with your device on DuckDuckGo or Google, “create a bootable USB-stick on your-device-name”). - After entering the desired computer-name and creating user-account credentials for the Ubuntu 18.04 Desktop, hit the Option-key or Windows key on keyboard and type in “Software Updater” within the Ubuntu-OS search-field and then hit enter; that should prompt the Ubuntu-updater- upon completion, select the “Install Now” button and then enter system-password.
- After running the Ubuntu-updater, restart the system.
- For the sake of thoroughness, update Ubuntu 18.04 from the command-line by running the following commands in sequence.
sudo apt-get updatesudo apt-get upgradesudo reboot
Download and Install Bitcoin Core
It’s important to know how to download and install Bitcoin Core from the command-line in addition to migrating the configuration files to an external-USB hard-drive since the Bitcoin blockchain is only getting bigger.
sudo apt-add-repository ppa:bitcoin/bitcoinsudo apt-get updatesudo apt-get install bitcoindsudo apt-get install bitcoin-qtsudo apt-get install libcanberra-gtk-module
After installing the one-liners above, the Bitcoin Core GUI can be launched by typing bitcoin-qt on the command-line; upon running the aforementioned for the first time, the application will prompt selection for either the default data directory ( ie /home/username) or a customized file-path, such as an external USB hard-drive (eg /MEDIA/alexanderjsingleton/SEAGATE)- select the customized-file-path for the external USB-hard drive and complete the set-up; it will take about 4 to 6 hours to download the entire Bitcoin Blockchain (as of this post, >= 248.8 GB). Alternatively, you can secure-copy the Bitcoin Blockchain from another drive on file; if available, please feel free to visit and scroll down to the respective section within another post, How to Run a Bitcoin Full Node on a Rasperry Pi.
Upon completing the download of the Bitcoin Blockchain, close Bitcoin Core and restart the computer; ordinarily, to start Bitcoin Core from the command-line referencing the internal hard-drive on the device, the command would be bitcoind -daemon OR bitcoin-qt to launch the Bitcoin Core GUI but try restarting the Bitcoin Core app from the command-line referencing the correct data-directory contained on the external USB-drive- eg (assuming you named external USB hard-drive as “SEAGATE”):
bitcoind -datadir=/media/alexanderjsingleton/SEAGATE/.bitcoin-OR- to launch the Bitcoin Core GUI run
bitcoin-qt -datadir=/media/alexanderjsingleton/SEAGATE/.bitcoinAfter a few minutes, try running either bitcoin-cli getconnectioncount to confirm peer count (>=8, if connected to the Internet) or check blockchain size by running bitcoin-cli getblockchaininfo.
Installing Blockstream, Bitcoin FIBRE and Dependencies
We’ll begin in reverse by beginning with installing all Blockstream and Bitcoin FIBRE dependencies before the aforementioned.

Blockstream and Bitcoin FIBRE Dependencies
From experience, it’s best to install the Blockstream dependencies and Bitcoin FIBRE dependencies as referenced within the Blockstream documentation on GitHub before the aforementioned applications- please proceed with the following commands in sequence:
sudo apt-get install git build-essential libtool autotools-dev automake pkg-config libssl-dev libevent-dev bsdmainutils python3 libboost-system-dev libboost-filesystem-dev libboost-chrono-dev libboost-program-options-dev libboost-test-dev libboost-thread-devsudo apt-get install libdb4.8-dev libdb4.8++-devsudo apt-get install libboost-all-devsudo apt-get install libqt5gui5 libqt5core5a libqt5dbus5 qttools5-dev qttools5-dev-tools libprotobuf-dev protobuf-compilersudo apt-get install libqrencode-devsudo apt-get updatesudo reboot
After rebooting, the Ubuntu 18.04 environment should be ready for installing Blockstream service.
Installing Blockstream
Fire up the terminal and run sudo apt-get update to ensure all environment dependencies are updated and then begin installing Blockstream by running the following commands in sequence:
sudo add-apt-repository ppa:blockstream/satellitesudo apt-get updatesudo apt-get install satellite
If after beginning the Blockstream satellite install with (ie sudo apt-get install satellite) on Ubuntu 18.04, the install is interrupted reporting the following error message within the terminal-output:
usr/share/mime/packages/gnuradio.xml:1: parser error : Start tag expected, '<' not found.The following remediation posted on StackOverflow: askubuntu will resolve the issue:
sudo nano /usr/share/mime/packages/gnuradio.xml- Go to the first row within the ‘gnuradio.xml’ file and prefix the missing
<at the beginning of the symlink (prefix directly, do not leave any spacing).- ie:
</usr/share/gnuradio/grx/freedesktop/gnuradio-grc.xml
- ie:
sudo update-mime-database -V /usr/share/mime/- Then restart the satellite-package install to ensure a complete install by running
sudo apt-get install satellite. sudo apt-get update- Test the install by running the following command:
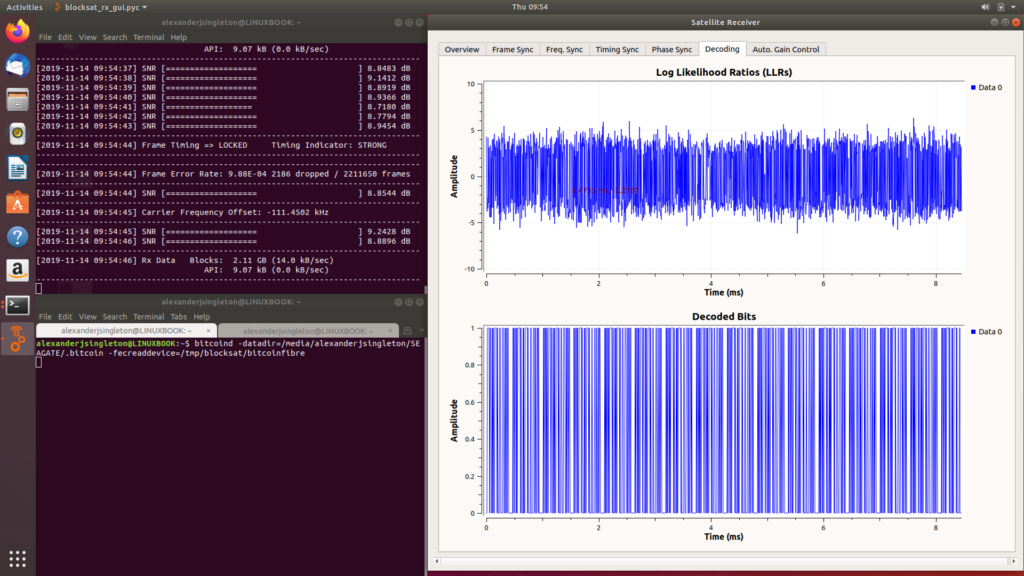
blocksat-rx-gui -f 1272850000; it should launch the satellite gnu-radio window on the right of the below screenshot (please note: the satellite LNB must be powered-on and connected to the laptop for the app to successfully launch- also note: if following the instructions, the window signal will look nothing like the below screenshot since the satellite is not properly aligned yet).

Installing Bitcoin FIBRE
Before beginning Bitcoin FIBRE install, please ensure to begin within the home directory (ie cd /home/username OR eg cd/home/alexanderjsingleton). Next run the following commands in sequence:
git clone https://github.com/bitcoinfibre/bitcoinfibrecd bitcoinfibre/git fetch origin pull/12/head:ootb./autogen.sh./configuremake && sudo make installsudo reboot- After reboot, Bitcoin FIBRE should be ready to run by running the following command without referencing an external USB hard-drive; however, please note, that this command should only be executing after running the Blockstream satellite gnu-radio app first in sequence:
-
blocksat-rx-gui -f 1272850000 bitcoind -fecreaddevice=/tmp/blocksat/bitcoinfibre
-
- Since this tutorial is referencing an external USB hard-drive containing the Bitcoin Core .conf files, the command syntax will be according to the following:
bitcoind -datadir=/media/username/device-name/.bitcoin -fecreaddevice=/tmp/blocksat/bitcoinfibreFor example:
bitcoind -datadir=/media/alexanderjsingleton/SEAGATE/.bitcoin -fecreaddevice=/tmp/blocksat/bitcoinfibreUnless any errors were encountered during the install, the Ubuntu 18.04 environment should be properly configured for running Blockstream service with Bitcoin FIBRE- but don’t expect anything to work in synchronization yet because the satellite isn’t properly aligned, which will be discussed in the third part of this series tutorial.

Part 3: Satellite Alignment
Ok, folks- this is the third and final evolution of this tutorial and it will require some patience since it’s the most time-consuming, especially if you have no experience with satellite alignment, which accounts controlling for azimuth, elevation and polarity.
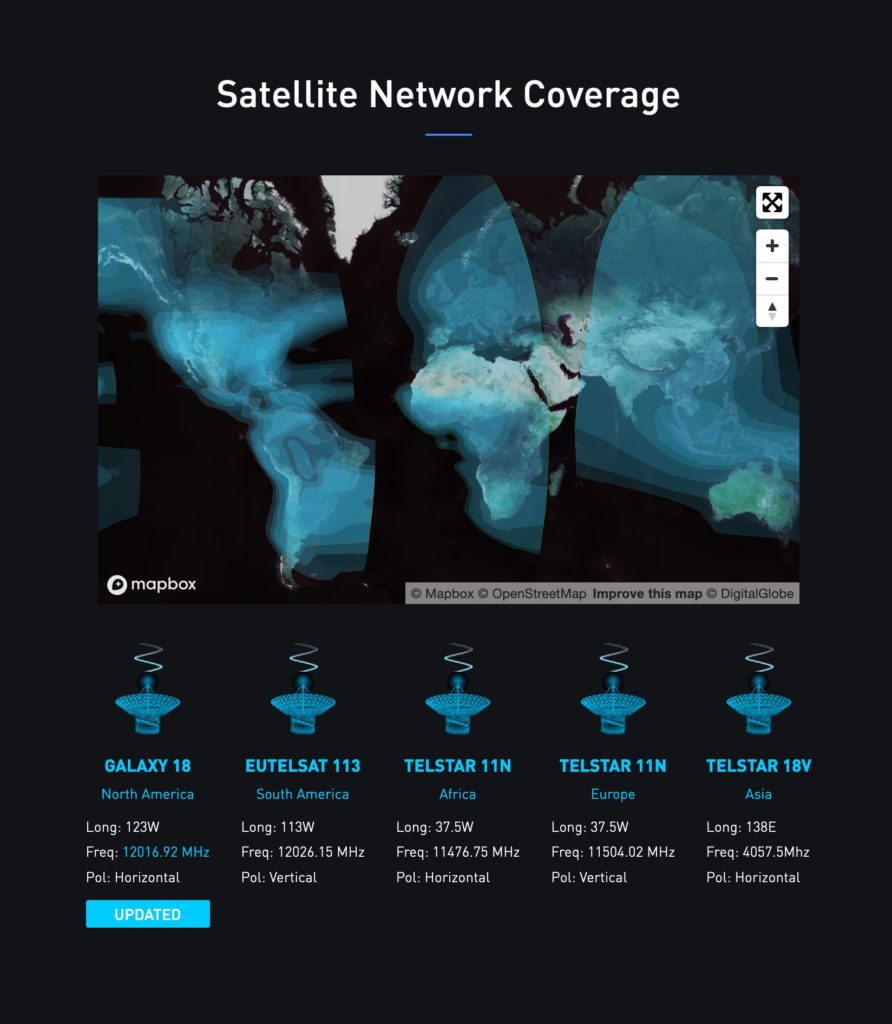
Let’s first begin by visiting the [Blockstream network coverage map] (https://blockstream.com/satellite/) to determine which location is in range; for the subject tutorial we are located within the Great State of Kansas, so according to the Blockstream Satellite Network Coverage map, Galaxy 18, is the target-satellite as depicted within the above screenshot.
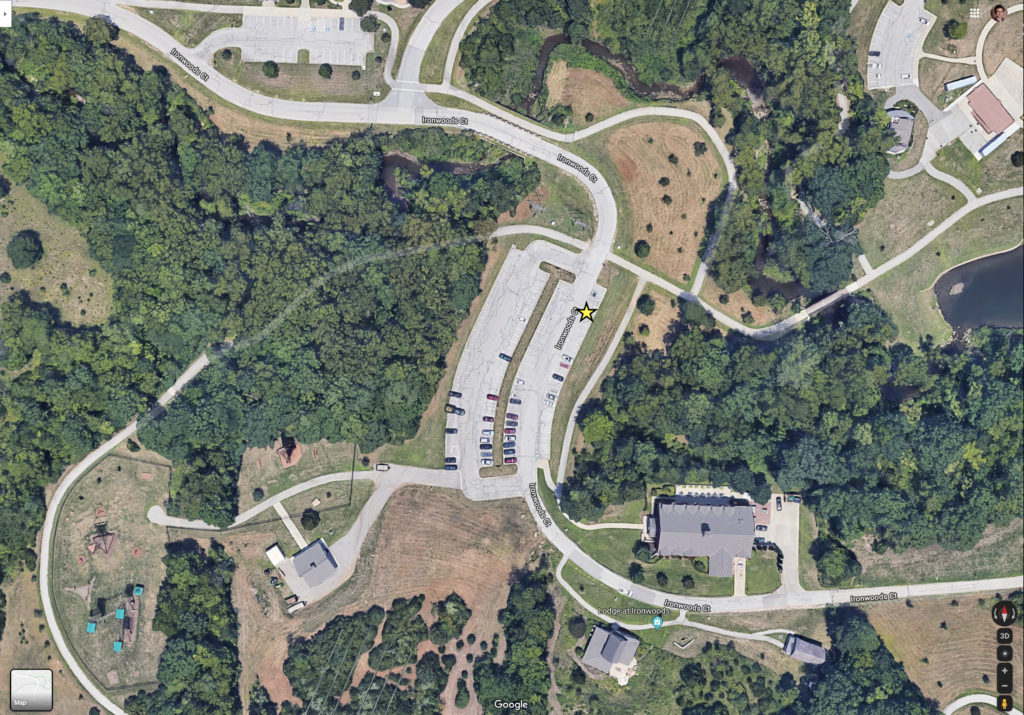
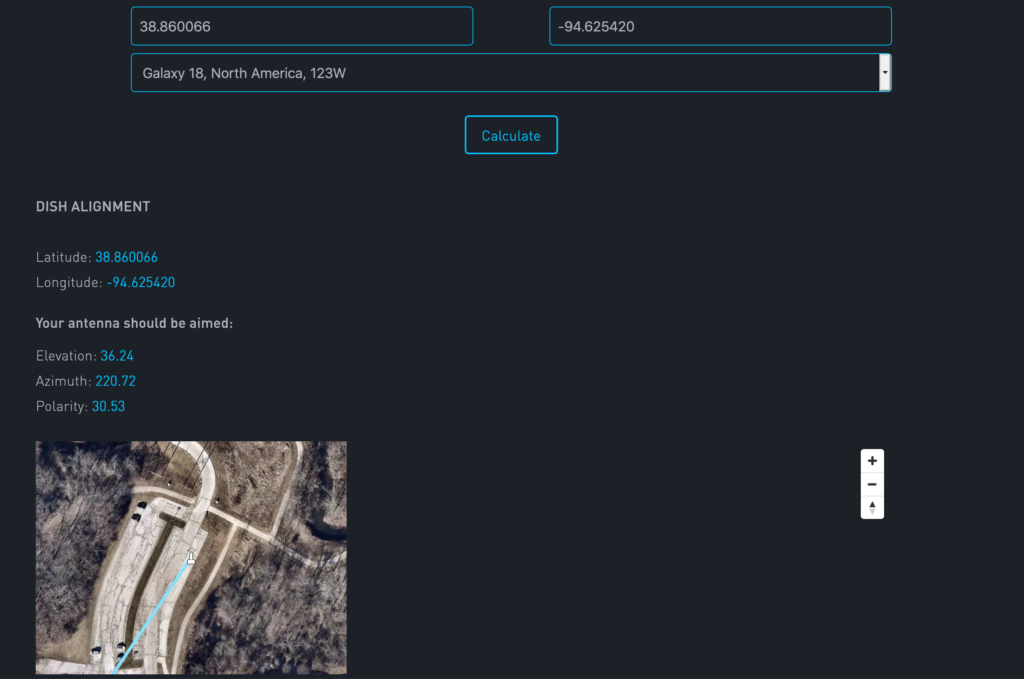
After noting the target satellite at Blockstream, go to Google Maps and locate the satellite line of sight position by entering the street-address then pinpoint the satellite location by double-clicking within the Google Maps area to ascertain the latitude and longitude- note these coordinates then return to the Blockstream satellite coverage map link and scroll down the page and select the “Dish Alignment Tool” icon and enter the street-address or location coordinates retrieved on Google Maps and select the appropriate satellite from the drop-down menu, in this case, Galaxy 18; the Dish Alignment Tool should generate a map highlighting the line of sight targeting the Galaxy 18 satellite in addition to providing the parameters for adjusting elevation, azimuth and polarity as detailed within the below screenshot.
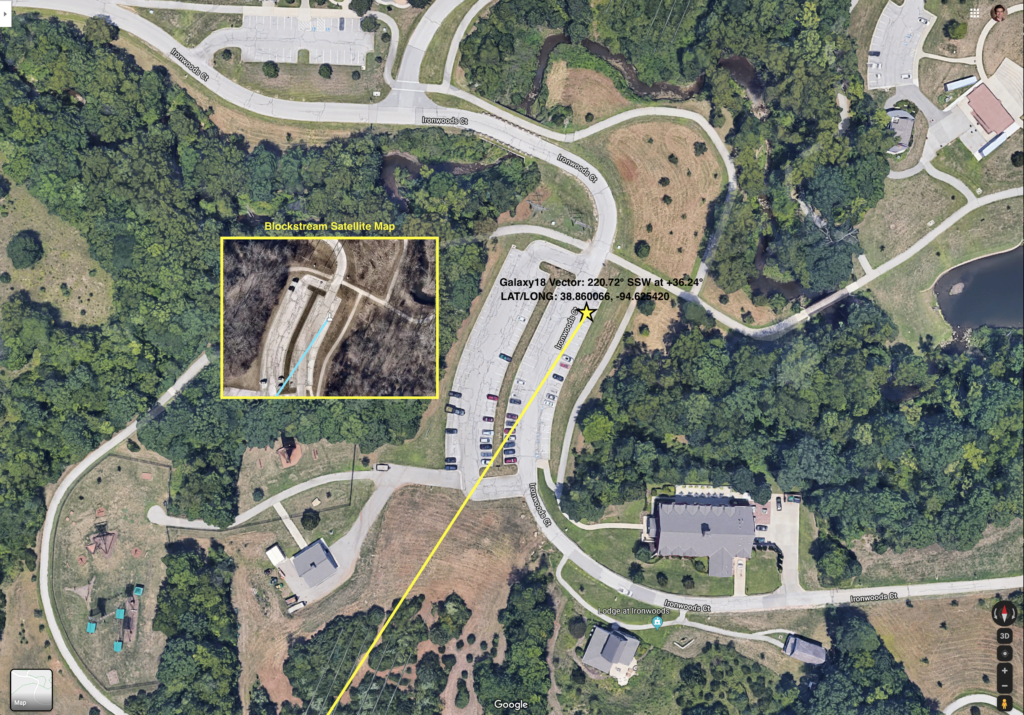
Although this tutorial will reference the Satellite Pointer iPhone app for satellite tracking out in the field, it’s always best to have a plan-b in the event of equipment failure; packing a copy of the Blockstream Dish Alignment tool map overlayed on the Google Map area (as depicted below) in addition to a simple Brunton compass with the rest of your gear is recommended to not only verify accuracy but also as contingencies in the event of any technical difficulties.
Upon determining the satellite position parameters for azimuth, elevation and polarity, go to the Blockstream docs on GitHub and scroll down to section 5 “Compute the Receiver Frequency,” to calculate the Galaxy 18 frequency using the heuristic table provided in the below screenshot.
According to the Blockstream heuristic table, the corresponding frequency for Galaxy 18 is 12016.92 MHZ, or 1,266,920,000 HZ; after converting the Galaxy 18 frequency from MHZ to HZ, subtract the LNB LO frequency on the LNB (if you’re using either the Maverick or GEOSATpro LNB as referenced within this tutorial, the LO Frequency is 10.75 GHZ or Ku High)- so the calculation is expressed thusly within the below markdown:
12,016,920,000 Hz - 10,750,000,000 Hz = 1,266,920,000 HzNow save the above calculation in a text file for reference on the laptop running Blockstream later at the line of sight location.
Next, prepare the elevation control and polarity by referring back to the Dish Alignment tool at the Blockstream website, which also provides azimuth, elevation and polarity specifications in order to acquire Blockstream service on Galaxy 18- please see values outlined in the below screenshot from the Blockstream Dish Alignment tool.
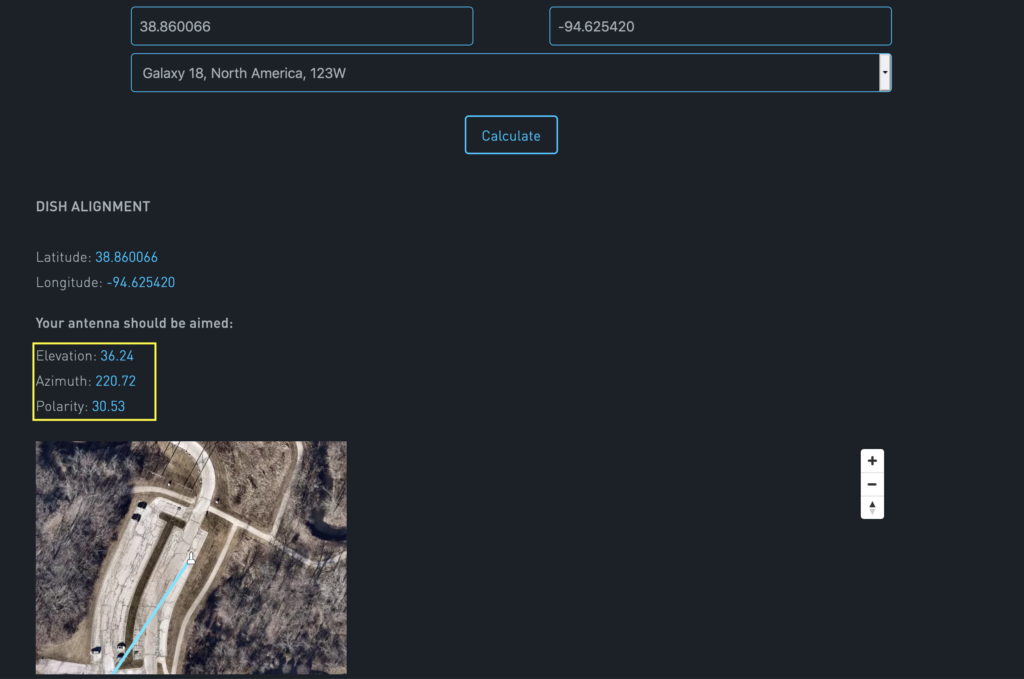
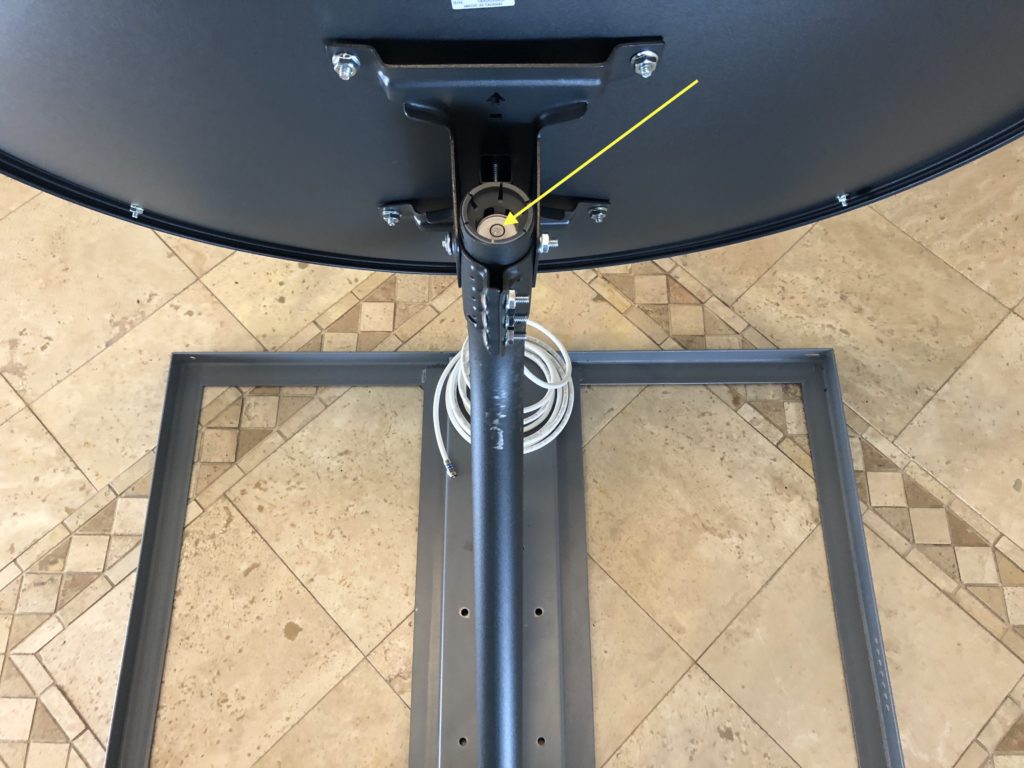
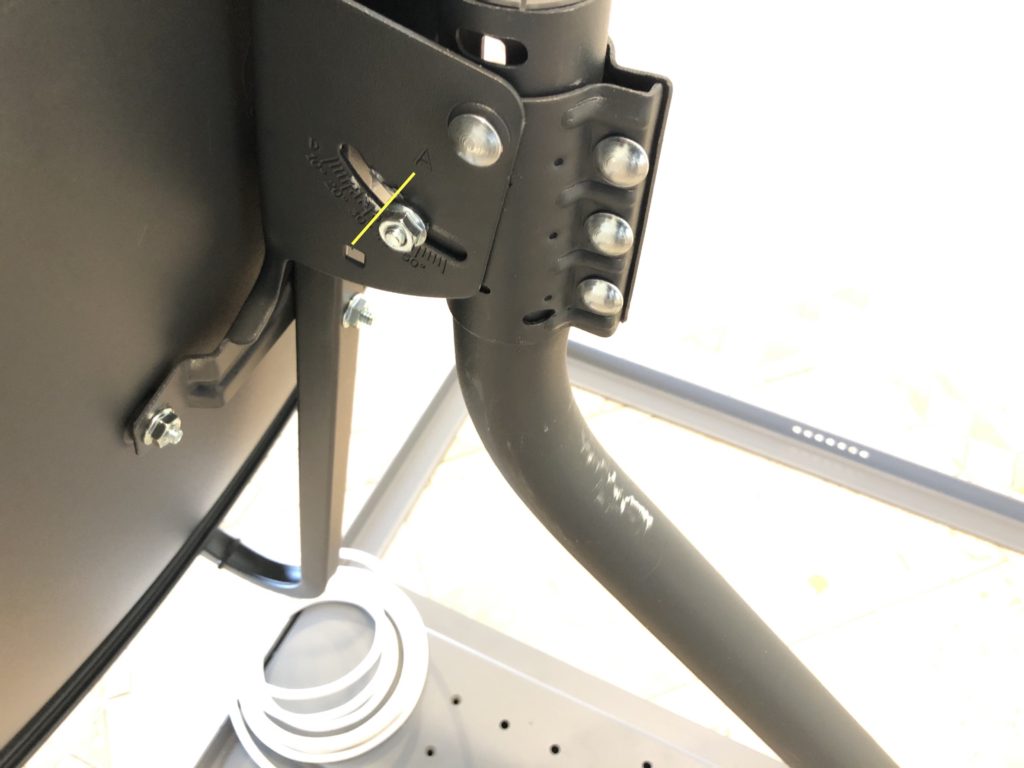
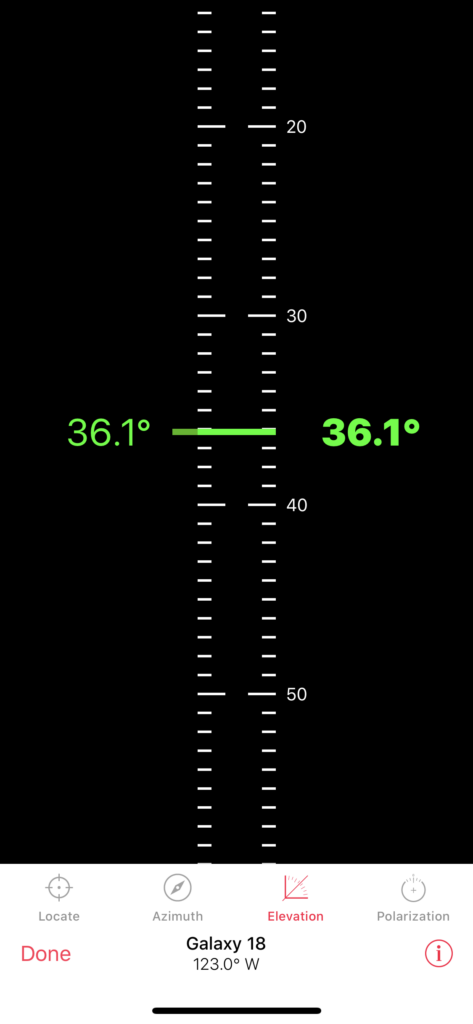
Assuming the satellite receiver is now ready for set-up, begin by setting the elevation-control on the satellite-mount as close to the value specified by the Blockstream Dish Alignment tool (in this case: 36.24°, as depicted within the below photo).
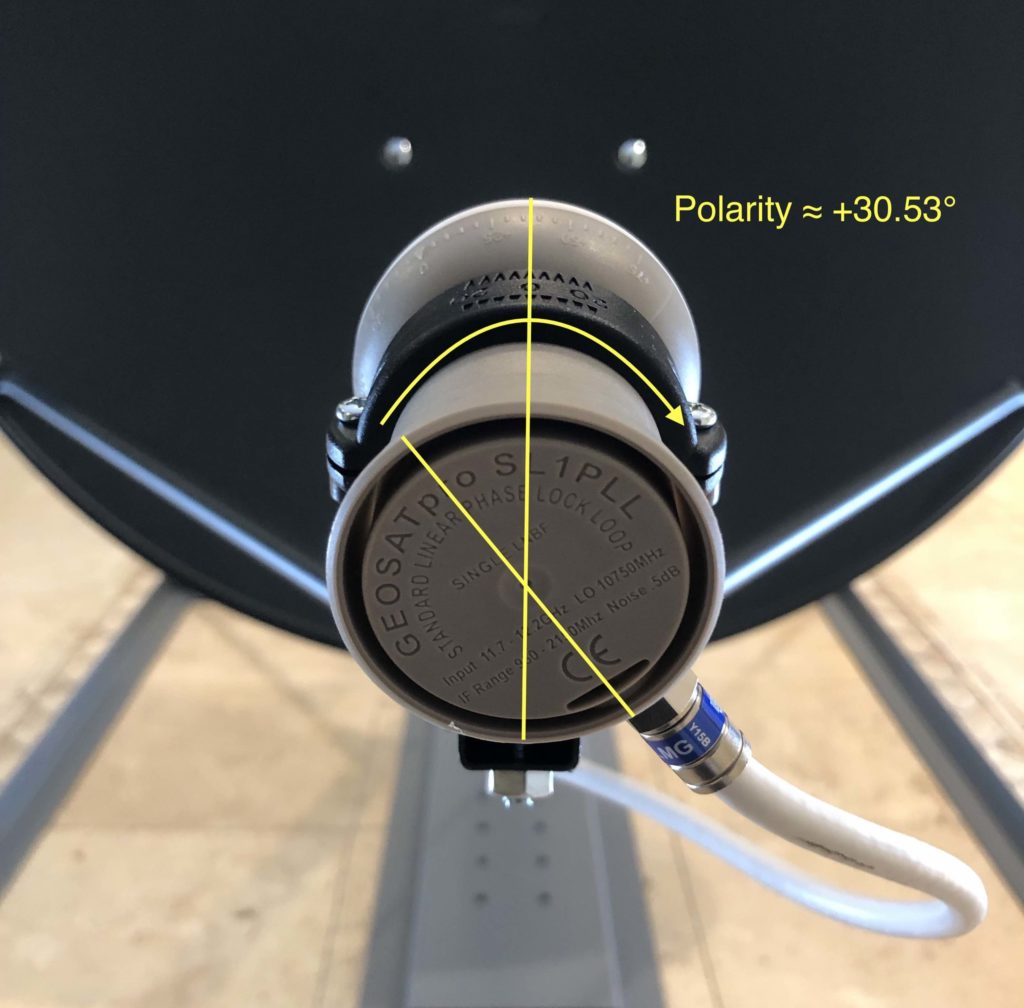
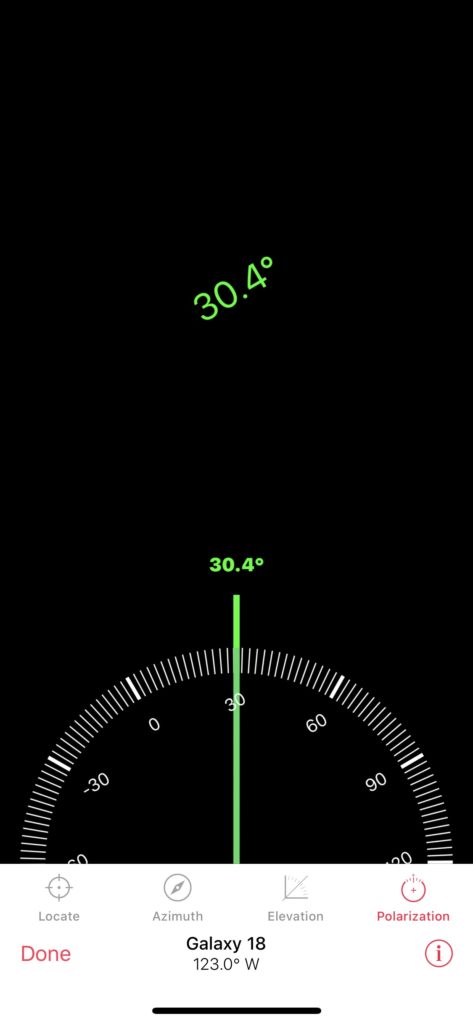
Next, adjust the LNB-receiver according to the value specified on Blockstream Dish Alignment Tool (Polarity = 30.53° as outlined within the below photo).
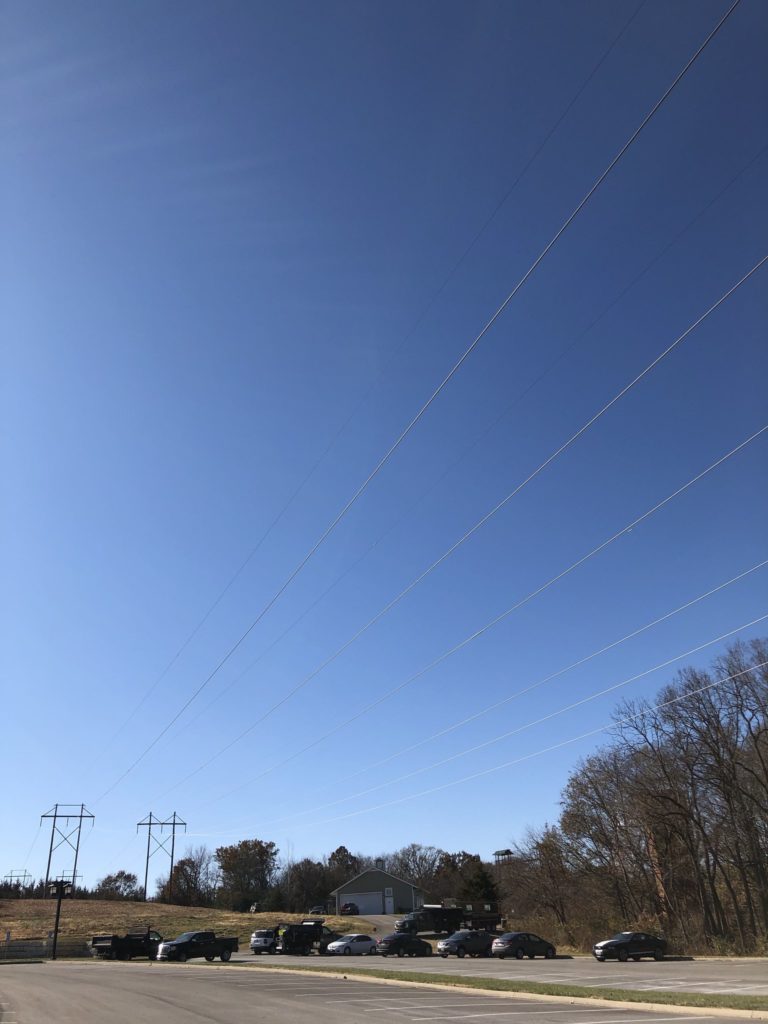
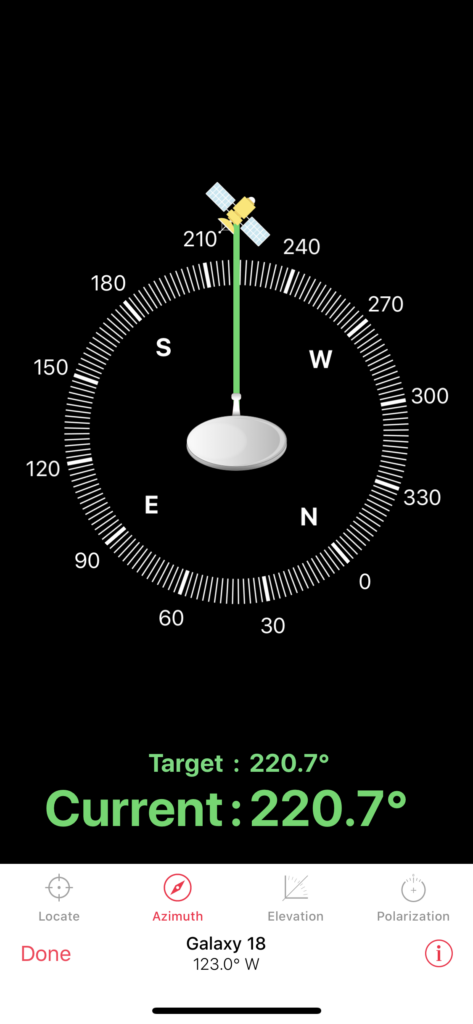
Assuming you’re ready to begin satellite-alignment, use your Brunton compass to find the general heading at the line of sight- a picture of the line of sight taken from the test-location at Iron Woods park is provided below as a frame of reference for the Satellite Pointer application on the iPhone. After opening the Satellite Pointer iPhone application while holding the iPhone vertically towards the mapped line of sight using the Blockstream Dish Alignment tool and/or Brunton compass, we can confirm that the heading is directionally-correct according to the screenshot taken from the below iPhone Satellite Pointer app.
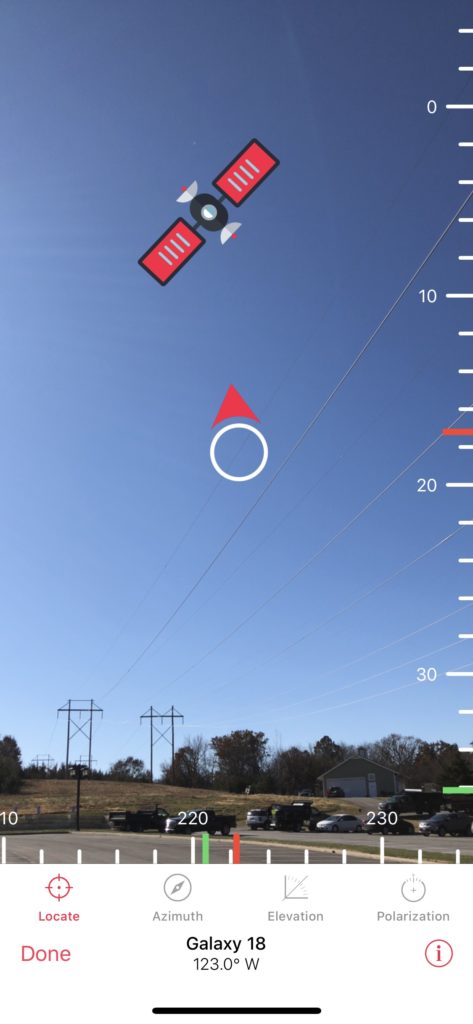
The Satellite Pointer app also provides guidance for adjusting the satellite but from experience it’s recommended to use a compass because the iPhone gyroscope could be compromised by electromagnetic interference- again, bring a back-up; if the instrumentation does not reflect reality, you better be an Eagle Scout or at least know how to orienteer. 🙂
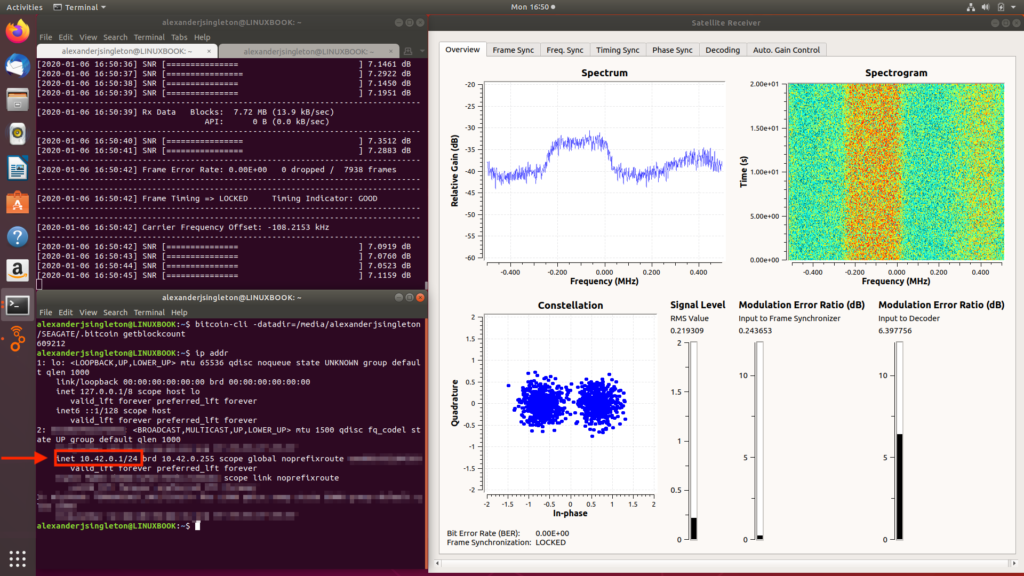
After configuring initial satellite alignment to the best of ability, start the Blockstream app on the Ubuntu laptop by first running the gnu-radio app along with the calculated frequency as demonstrated within the below markdown.
blocksat-rx-gui -f 1266920000After starting the gnu-radio application, the ideal goal is to calibrate satellite alignment according to the red-arch outlined within the “Spectrum” field as detailed within the below screenshot- PLEASE NOTE: this is the most pain-staking part of acquiring signal, the satellite must be adjusted millimeter by millimeter, vertically and horizontally, in order to lock on to Blockstream service, which will be reported within the terminal-windown as “BLOCKSTREAM SIGNAL ACQUIRED.”
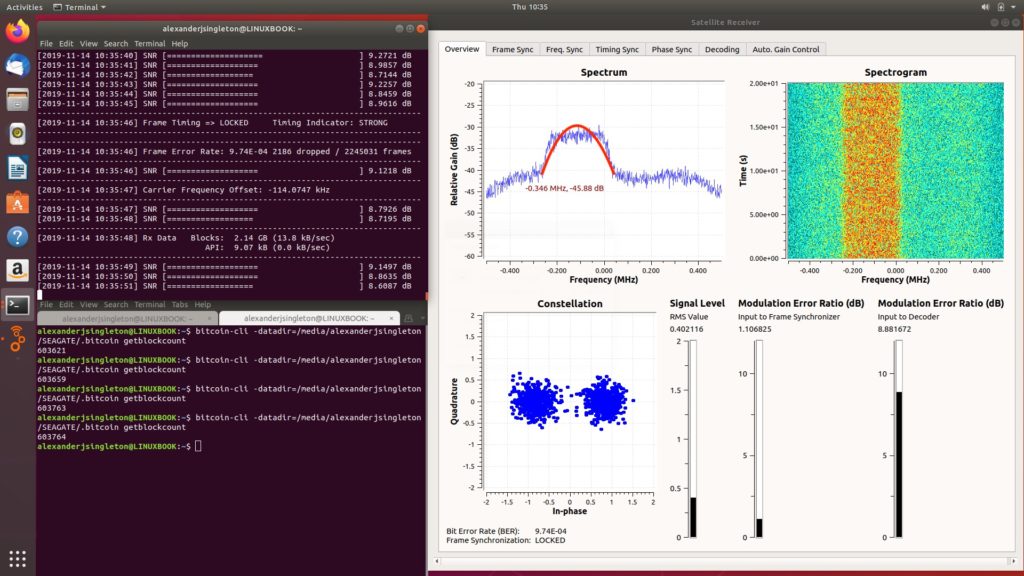
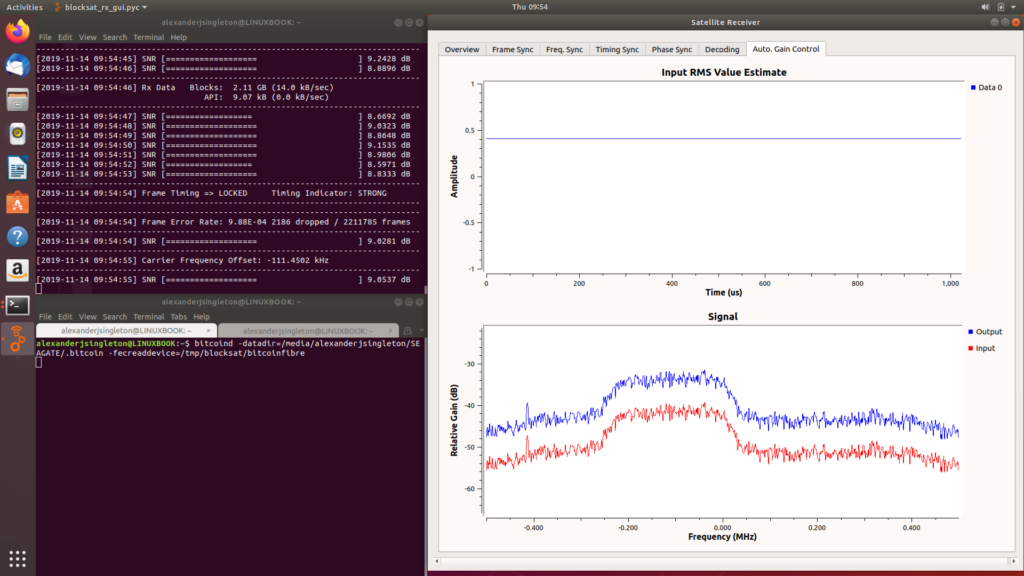
After successfully acquiring signal, try appending --gain 50 to running with gnu-radio with Blockstream- for example:
blocksat-rx-gui -f 1266920000 --gain 50That parameter should return an optimized Blockstream gain field set as displayed within the below media-gallery.
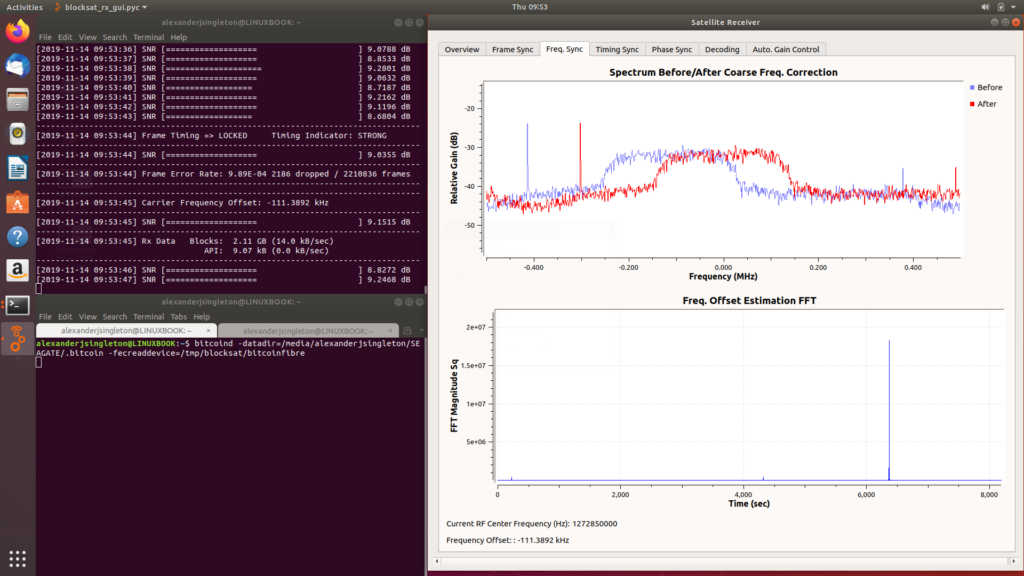
Upon confirming constant Blockstream service without interruption (there should be a buffer-file increasing but Bitcoin FIBRE is not running yet), open another terminal-window and run Bitcoin Fibre- remember, if you’re running Bitcoin FIBRE without an external hard-drive the command is:
bitcoind -fecreaddevice=/tmp/blocksat/bitcoinfibre But if you’re running Bitcoin with an external hard-drive, the Bitcoin FIBRE command would be run according to the following syntax:
bitcoind -datadir=/media/username/device-name/.bitcoin -fecreaddevice=/tmp/blocksat/bitcoinfibreOR, for example:
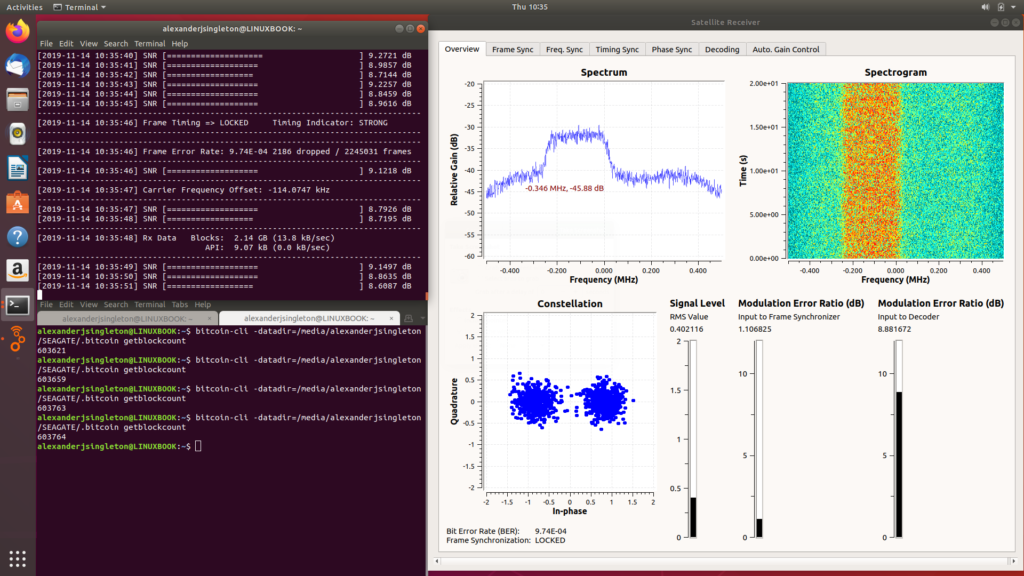
bitcoind -datadir=/media/alexanderjsingleton/SEAGATE/.bitcoin -fecreaddevice=/tmp/blocksat/bitcoinfibreAfter running Bitcoin FIBRE for about 15 minutes without connection to the Internet, try verifying block-count by appending general bitcoin daemon commands; for example, to check block-count, run:
bitcoin-cli -datadir=/media/alexanderjsingleton/SEAGATE/.bitcoin -fecreaddevice=/tmp/blocksat/bitcoinfibre getblockcountThe above command should return the current Bitcoin Blockcount within the terminal output. A brief screencast of the Blockstream GNU radio is provided below along with the expected terminal output reviewing a successful node running Bitcoin from space with Blockstream via satellite, without the Internet!
That’s a Wrap- Encore?
Alright, folks- that’s a wrap; at this point you should be able to run Bitcoin from space with Blockstream. If for whatever reason you experienced any difficulties with these instructions, there will be a screencast detailing all of the procedures herein to be released within a few weeks of this blog-post – stay tuned…

Encore: Quantum of Solace

Preparing Blockstream Environment
- Launch the Ubuntu 18.04 connection editor by running the following command on the terminal:
nm-connection-editor. - After Connection Editor launches, select “Wired Connection 1” and then click on the settings-wheel icon on the bottom of the window.
- Next, within the “Wired Connection 1” settings window, click on the “IPv4 Settings” tab and then in the corresponding field for the “Method” field, change the default-setting from “Automatic DHCP” to “Shared to other Computers” then click on the “Save” button within the bottom of the window, and then close the window.
- Return to the terminal and type
ip addrto ascertain the local inet address; locate the “inet” field- the corresponding default address should be10.42.0.1.
Preparing Blockstream Relay Environment
- Fire-up the Bitcoin Core GUI by running:
bitcoin-qt -datadir=/media/computer-name/external-hard-drive-name/.bitcoin- eg:
bitcoin-qt -datadir=/media/alexanderjsingleton/SEAGATE/.bitcoin
- Allow the blocks to sync and wait for a bit.
- After the blocks sync, and assuming the Wavlink Aerial HD2 is already connected and broadcasting from the nearby Blockstream environment, click on the Wi-Fi connection manager in the top right corner of the Ubuntu 18.04 Desktop; turn-on or enable, and then select the “Wavlink Aerial S” nearby.
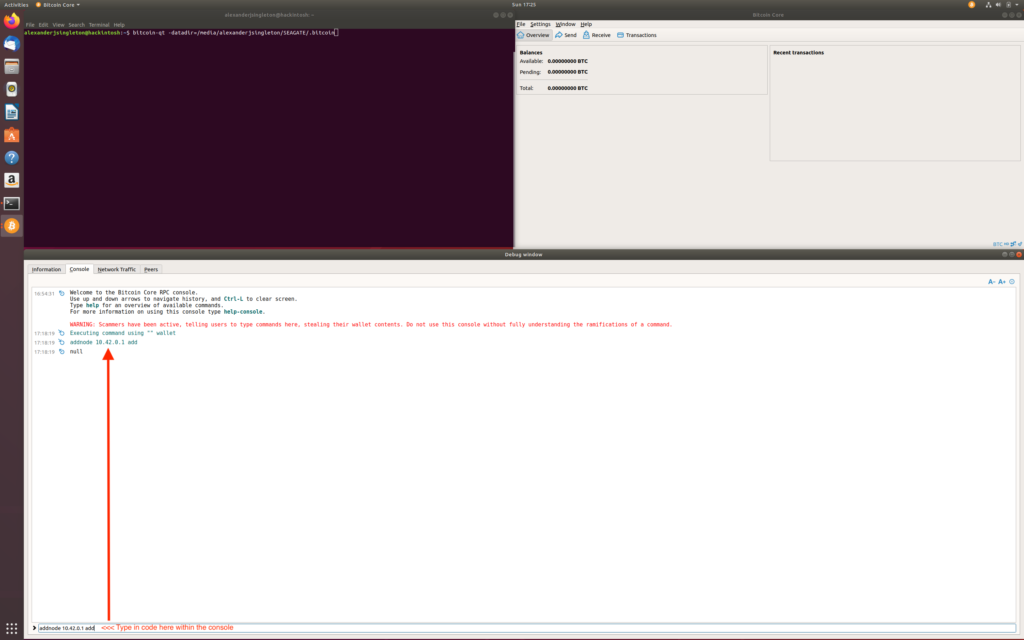
- Return to the Bitcoin Core GUI tool-bar and select “Window” > “Console”.
- After the Bitcoin Core GUI console launched, add the “inet” field denoted earlier in the Blockstream environment prep (ie
10.42.0.1) according to the following convention:addnode <node> <add|remove|onetry>- eg:
addnode 10.42.0.1 add
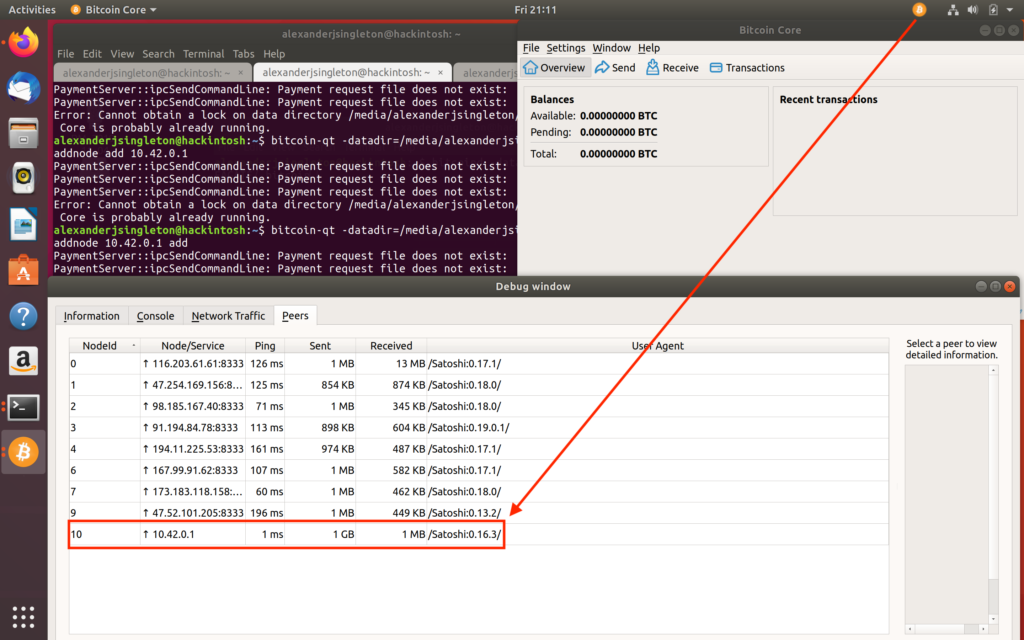
addnode 10.42.0.1 add- Once again, MISSION ACCOMPLISHED! After running Bitcoin for a few hours, go to the GUI toolbar and select “Windows” then “Peers”; the relay environment should be feeding from the Blockstream node nearby as denoted within “Node/Service” field (ie
10.42.0.1) from the corresponding screenshot.
2 comments for “GoldenEye: Running Bitcoin from Space with Blockstream”